Bunnyshell and Neon Postgres - A Guide for Automating Testing Environments with Production-Like Data
Introduction
Developing and testing software applications often require creating and managing sandbox environments. These environments, which are dynamically created and isolated, allow developers to test new features, debug issues, and experiment with data without impacting the live application. However, setting up and managing these environments can be a complex and time-consuming task. Moreover, populating these environments with realistic, production-like data presents its own set of challenges.
In this article, we'll guide you through the process of automating the creation of sandbox environments using Bunnyshell and Neon Postgres. We'll also discuss how to populate these environments with production-like data, enhancing the accuracy and effectiveness of your testing processes. By the end of this guide, you'll have a clear understanding of how to leverage these tools to streamline your development and testing workflows.
What is Neon?
Neon is a serverless Postgres database that revolutionizes the way developers work with data. It offers a unique branching feature that allows developers to create independent copies of their database, known as branches. This functionality is particularly useful for testing new features, debugging issues, or experimenting with data without impacting the production database. By streamlining the development and testing process, Neon enhances the reliability and quality of software applications.
In the context of automating sandbox environments, Neon's data branching feature allows for the creation of realistic, production-like testing environments, significantly improving the accuracy of your tests.
What is Bunnyshell?
Bunnyshell is an Environment as a Service (EaaS) platform that simplifies the creation and management of ephemeral environments on Kubernetes. It empowers developers by allowing them to instantly spin up unlimited development, preview, or testing environments for any task. In this tutorial, you'll use Bunnyshell to deploy a sandbox environment starting from DockerCompose for a Node.js, React, and Postgres app.
Bunnyshell's ability to quickly and easily create and manage environments makes it an invaluable tool for automating the creation of sandbox environments, reducing the time and effort required to set up and manage testing environments.
Challenges with Data for Testing
Creating testing environments that accurately mirror production environments presents several challenges:
- Slow Seeding: Migrating production data into a testing environment can be a slow process, especially for large databases. This can delay testing and slow down the overall development process. However, with Neon's data branching feature, you can create a copy of your production database in seconds, significantly speeding up the migration process.
- Stale Data: Over time, data in a testing environment can become outdated or "stinky," making it less representative of the current state of the production environment. Neon addresses this issue by allowing you to easily update your testing database with the latest data from your production database.
- Unrealistic Dummy Data: Dummy data, while easy to generate, often lacks the complexity and variability of real-world data. This can lead to less effective testing and potential issues being missed. By using a copy of your production data for testing, you can ensure that your tests accurately reflect real-world scenarios.
Prerequisites
- A Bunnyshell account to deploy the testing environments
- A Neon account for the database
Steps
- Importing the DemoBooks application into Bunnyshell
- Integrating your Neon database into the Bunnyshell environment
- Testing the Neon database integration
Importing the DemoBooks Application in Bunnyshell
This tutorial assumes that you are familiar with Dockerfiles and Docker-Compose definitions. The focus here is on deploying a sandbox environment that starts from a local or "development" environment definition but with data populated from production.
Start by deploying the application entirely in containers, including the Postgres database. This initial step will make it easier for you to debug later when you replace the container-based Postgres with a Neon Postgres data branch.
- By default, when creating a new account in Bunnyshell, the DemoBooks application will be automatically added to your Project as part of our platform walkthrough. Please make sure you're using the neon-database Git branch for this demo, as it has a few changes required to connect to the Neon database in the next step.
- If the DemoBooks application isn't automatically added, you can manually import it. Follow the detailed steps in this article on how to import a Docker-Compose-based definition into a Bunnyshell environment.
- Once you've successfully imported and deployed the DemoBooks environment on Bunnyshell, clone it via Actions → Clone and name it DemoBooks-Integration, suggestive of an integration environment. This cloned environment allows us to test the automatic creation of new data branches later.
Advanced option: If you're connecting your own Kubernetes cluster, you have the option to deploy Helm charts or Manifest-based applications.
Integrating the Neon database into the Bunnyshell Environment
In this step, you will replace the container-based Postgres database with a Neon Postgres database.
- Firstly, let's remove the db component from the bunnyshell.yaml. On the DemoBooks environment page, click on the Configuration button, then scroll down to where the db component is defined and delete starting with the - character until the end of the component definition.
1components:
2  -
3      kind: Database
4      name: db
5      gitRepo: 'https://github.com/bunnyshell/demo-books.git'
6      gitBranch: master
7      dockerCompose: <...environment...>
8 volumes: <...db-data...>-
Now let's add a new component that dynamically creates a data branch in your Neon account. Click on the Add component button on the upper right side of the configuration page and select Neon database. Finally, click the Insert Neon Database button.
-
Let's dissect what this component does:
1-
2      kind: GenericComponent
3      name: neon-database
4      runnerImage: bunnyshell/basic-runner-image:0.1.0
5      deploy:
6          - curl -L -o create_database.sh https://raw.githubusercontent.com/bunnyshell/connectors/main/neon-database/scripts/create_database.sh
7          - . create_database.sh
8      destroy:
9          - curl -L -o delete_database.sh https://raw.githubusercontent.com/bunnyshell/connectors/main/neon-database/scripts/delete_database.sh
10          - . delete_database.sh
11      start:
12          - echo "Start scripts are not needed. Neon has auto-idle and auto-start capabilities, so control from Bunnyshell is not needed."
13      stop:
14          - echo "Stop scripts are not needed. Neon has auto-idle and auto-start capabilities, so control from Bunnyshell is not needed."
15      exportVariables:
16          - DB_HOST
17          - BRANCH_ID
18      environment:
19          API_TOKEN: [[NEON_API_TOKEN]]
20          DB_HOST: '{{ components.neon-database.exported.DB_HOST }}'
21          BRANCH_ID: '{{ components.neon-database.exported.BRANCH_ID }}'
22          PROJECT_ID: [[NEON_PROJECT_ID]]
23          SOURCE_BRANCH_ID: [[NEON_SOURCE_BRANCH_ID]]
24          TARGET_BRANCH_NAME: 'bns-{{ env.unique}}'
Type: You're creating the Neon database from a GenericComponent, which is essentially a runner that executes the custom scripts to create a new branch and fetch the connection details. Actions: The deploy/destroy and start/stop sections define what happens when each environment action is triggered. When deploying and deleting an environment, the Neon database branches are created or deleted. Export variables: The DB_HOST variable will be later injected into our backend component as the Postgres hostname. Both export variables are also saved in the Bunnyshell environment context and re-injected when restarting or redeploying the environment so that the platform knows how to identify an existing Neon database branch without creating a new one. Environment: As the section suggests, these values will be passed as environment variables for this component's runner.
For more details on how the data branch is created, please consult the create_database.sh script from the component actions.
Books with Neon
- Once you have added the Neon database component, the next step is to set up the connection details as environment variables.
-
From the Environment page, click on the Actions button, then Environment Variables.
-
Click on Add variable and fill in the following information from the Connection Details in your Neon Dashboard.
POSTGRES_USER: The Role field. (ideally marked as secret). POSTGRES_PASSWORD: Unhide, then copy the password as described here (marked as secret). POSTGRES_DB: The Database field (ideally marked as secret).
NEON_SOURCE_BRANCH_ID: Go to the Branches page, click on main, then copy its ID. The newly created environments will branch off the main database. NEON_PROJECT_ID: Go to the **Settings **page, then copy your Project ID. NEON_API_TOKEN: Create a new API token as described here. (marked as secret)
- Once you have all the variables set, you should see the environment configuration updated:
1environmentVariables:
2    NEON_API_TOKEN: '<<BNS_SECRET>>'
3    NEON_PROJECT_ID: bold-shadow-168128
4    NEON_SOURCE_BRANCH_ID: br-frosty-mud-840365
5    POSTGRES_DB: '<<BNS_SECRET>>'
6    POSTGRES_PASSWORD: '<<BNS_SECRET>>'
7    POSTGRES_USER: '<<BNS_SECRET>>'
Finally, you'll inject the newly created environment variables into our neon-d
1environment:
2    API_TOKEN: '{{ env.vars.NEON_API_TOKEN }}'
3    PROJECT_ID: '{{ env.vars.NEON_PROJECT_ID }}'
4 SOURCE_BRANCH_ID: '{{ env.vars.NEON_SOURCE_BRANCH_ID }}'- Now that you imported the database component, the last step is to inject the Postgres host into our backend component by adding the environment variable in the dockerCompose section:
1components:
2    -
3        kind: Application
4        name: backend
5        dockerCompose:
6            environment:
7                POSTGRES_HOST: '{{ components.neon-database.exported.DB_HOST }}'
In this section, we've walked through the process of integrating the Neon database into the Bunnyshell environment. We started by removing the db component from the bunnyshell.yaml file and then added a new Neon database component. We then set up the connection details as environment variables and injected these variables into our neon-database component. Finally, we injected the Postgres host into the backend component so that the app could connect to the dynamically created Neon database.
With these steps, we've successfully replaced the container-based Postgres database with a Neon Postgres database branch, setting the stage for more efficient and effective testing with production-like data.
Testing the Neon Database Integration
To test the new integration, you'll add some data in the main Neon database (branch), then verify that it propagated in the cloned environment data branch and vice versa.
- Insert a new book in the main branch: In the Neon SQL Editor, insert a new row in the books table:
INSERT INTO books ("title", "author") VALUES ('Seinfeld', 'Jerry Seinfeld');-
Deploy the 'integration' environment: In the DemoBooks-Integration environment page, click Deploy. If the deployment is running into errors, please refer to the Troubleshooting section.
-
Find the new book in the DemoBooks UI: Once the integration environment is deployed successfully, click on the URLs button and open the frontend link. In the Books table, you should see the ‘Seinfeld’ title you added in the previous step.
-
Add a new book in the DemoBooks UI: Click on Add book in the DemoBooks app to create a new Book. You can verify that it's been persisted in the cloned database by running the following select query in Neon's SQL Editor. However, the record should not appear in the main database.
select * from books;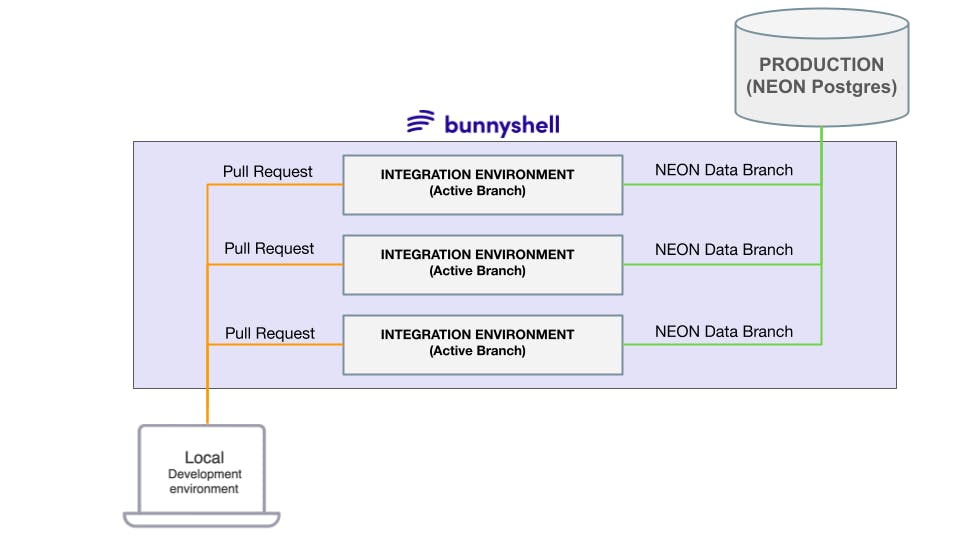
Dynamic integration environments populated with production data via data-branching.
Troubleshooting
Encountering issues is a normal part of the development process. Here are some common problems you might face and their solutions:
Issue 1: Failed Deployment
Bunnyshell provides detailed pipeline logs that can help you identify the deployment issue. Look for any error messages or warnings on the Pipelines page.
Once you've identified the issue, you can make the necessary changes to your bunnyshell.yaml or code and try deploying again.
Issue 2: Database Connection Errors
The most common reasons for failing to connect to the database are:
- Incorrect database connection logic in the application code - In your Neon Dashboard, at the bottom of the Connection Details section, you will see Code examples.
- Incorrect database connection details - You can SSH into the backend container using the Bunnyshell CLI and manually verify the environment variables containing the connection details to match the ones from the Neon Dashboard.
For both issues, you can check the application logs at the component level to check if the database connection succeeded or failed. More details in the docs.
Remember, the Bunnyshell support team is always available via chat or email to help you resolve any issues you encounter.
Anonymizing Production Data for Testing
While using production-like data for testing can significantly improve the quality of your tests, it's crucial to ensure the privacy and security of your data. Anonymizing your production data for testing purposes is a best practice that helps protect sensitive information.
Anonymization involves modifying data so that it can't be associated with a specific individual or entity. This can be done through various methods, such as data masking, pseudonymization, data swapping, and more.
For a detailed guide on how to anonymize your production data for testing, you can refer to this article or try out tools like PrivacyDynamics.
Further Exploration
- Developing with Production-Like Data: Because most of the code iterations happen in the development environment, you can now benefit from realistic data and test your code based on relevant data quantity and quality without having to perform costly migrations or work on dummy or ‘stinky’ data. You can use the environment you defined in this tutorial for development exactly as you would run DockerCompose on your local machine. To learn more about remote development, check our docs.
- Automating Testing Environments in the CI Pipeline with Production-Like Data: Spinning sandbox environments in Pull Requests using the CI is becoming a common practice and for a good reason. Now that you can have production-like data in a matter of seconds, you can start running End-to-End tests before merging the feature branch. This way, you can catch bugs earlier in the development process, avoid costly bug fixes, and ship higher-quality code.
Conclusion
Testing your applications with production-like data is a crucial but often challenging and time-consuming task. Thankfully, tools like Bunnyshell and Neon significantly simplify this process for applications using Postgres databases. In this tutorial, you've learned how to deploy your Docker-Compose-based application and automatically create a Postgres-isolated database for each new sandbox deployment. This capability improves your testing practices, enabling you to uncover potential bugs earlier in the development process before merging your feature branches.
If you found this article helpful, remember that Bunnyshell and Neon offer free tiers, as well as limited free usage on our managed Kubernetes cluster, to help you get started. If you need assistance in automating the creation and management of your cloud environments, don't hesitate to reach out to our team or book a demo. Start improving your development and testing workflows today!